... but fortunately seems to be ok on the inside even when the temperature drops to -5 on the outside.
Strange but true - at 19 degrees C, the house feels warm (whereas it felt much less comfortable at the same temperature before the insulation and draught-proofing).
The plaster is still drying out and the brickwork is still warming up after a year of exposure to the elements, so the gas boiler is working harder than it will need to next year, all other things being equal.
The 3 tiny radiators are not really enough to keep every room at 19 or 20 degrees C under these circumstances, but we are happy with bedrooms dropping to 17 or 18 degrees C at the coldest point in the night. (It beats the 8-12 degrees C that was the midwinter norm in 2010 and 2011).
The other striking difference for me is the complete absence of joint pain, which was a permanent feature for at least 4 months through previous winters. I had a hunch it was down to cold and damp in the house and I'm really delighted to experience such a spectacular difference this year. (Of course, for those who haven't got an extensive collection of injured joints, it won't make much difference).
The energy bills will also have a story to tell, but I don't have enough measurements yet (and there are further efficiency improvements to make anyway before the house reaches its "as designed" state).
One thing you do have to get used to is condensation or ice on the outside of the windows (because heat loss through the triple glazing is so low that the ice can still be found on the outside of the windows for hours - until the sun melts it off). I'm not complaining - so much nicer than having the ice on the inside as was the case for days on end in winter 2010 and 2011.
Friday 14 December 2012
Tuesday 6 November 2012
Moving in!
Finally, we have moved back in! There is still a fairly long list of things yet to be done (e.g. installing a kitchen) but great progress has been made in the plumbing department since moving in 2 weeks ago.
So what's it like? Thermally, it is fantastic - warm, comfortable, the temperature is stable, no hot and cold spots, no draughts. The thermometer sits around 19-20 degrees all the time. It is a completely different house from the one we moved out of a year ago.
We have 3 tiny radiators, which are currently on to help dry out the plaster, but we've had to turn some of them down or it gets too hot. So it looks as if the heating system is about right for the house. We'll know by the end of the winter if the system is adequate in really cold weather.
Since the MVHR was switched on, air quality has also been very pleasant (much better than having a window or two open, which did not promote air flow in every room).
It is still something of a DIY zone, but we are getting there. Not quite ready to commission the MVHR system and carry out the final air tightness test...
Tuesday 21 August 2012
Open house visits in the Nottingham area
This house and other low energy new builds / refurbishments will open their doors to people who are interested during September.
For details, go to http://wbecohouses.co.uk/
For details, go to http://wbecohouses.co.uk/
Monday 20 August 2012
Air tightness definitely heading in the right direction!
Now that the attic roof and the extension roof have been "taped and membraned" to the hilt, we've had an air tightness test to see whether we are anywhere near the EnerPHit target of 1 ACH @ 50 Pa.

The average of the de-pressurisation and pressurisation (sucking air out and blowing air in) values came out at 1.078 ACH @ 50 Pa, which is certainly cause for optimism! We are extremely grateful to our merry band of Eco House Group helpers who came along and tracked down draughts during de-pressurisation, or went round with tape and sealant blocking up the draughts identified. While some draughts are easy to spot and solve, it is truly amazing how some draughts can be felt, but no obvious hole or fault in the taping can be seen.
In the days following the test there were some worrying moments when the plasterboard went on as this can stretch or puncture the membrane if it is a little tight in places (almost inevitable in a complex roof structure like this one). However, improvements elsewhere cancelled out any small issues which we could not detect behind the plasterboard, so we are still on track.

As long as the remaining refurbishment work results in a few improvements and no mistakes, we should be able to get below the magic figure of 1. But success is by no means guaranteed so we'll be waiting until the very end to find out if we have made it.
For those more familiar with the other way of expressing air tightness (air permeability), Midland Energy Services has also provided that figure: 1.07 m3/h.m2 @ 50 Pa.
Air Permeability and Air Changes per Hour do not necessarily match, but in a medium sized house like this one, they can do. For a small flat or a large hotel, the two figures would be very different.
Friday 20 July 2012
Another little power station goes live in West Bridgford
Although I've been somewhat preoccupied with air tightness of late, other things are happening. Today, the new PVs were hooked up to the electricity meter and we are now generating energy and feeding it to the grid. Now all we need is some sun....
Compared with all the other work we've had done, the 2 visits from the team at Carbon Legacy to install the PVs have been most straightforward. What is there to say? Day one and the panels appear on the roof, day two and the cables link to the inverter and from there to consumer unit and meter.
The amount of electricity which we hope the system will produce in a year should be a little over 3,000 kWh. This will hopefully equate to a significant proportion of our total annual energy use (electricity plus gas) once the low energy refurbishment is complete. (I'm expecting total energy use to be between 6,000 and 9,000 kWh a year - watch this space!)
For comparison, the original estimate for annual energy use in the "as bought" state (based on a SAP energy model) was 36,000 kWh. In fact, energy-saving habits meant that we only used about 24,000 kWh of gas + electricity in a year.
This is like a mini version of the UK's energy challenge. The Department of Energy and Climate Change anticipate that the UK could face energy shortages by 2015. Hence the interest in generating more renewable energy in one form or another. However, there's a very long way to go to meet ever-growing demand for energy, especially with certain older power stations reaching the end of their lives soon.
However, if homes, business etc. were very energy efficient and used MUCH LESS energy (through additional energy-saving habits, insulation, more efficient appliances and equipment, etc), then the scale of the challenge would be reduced - and the chance of power outages in 2015 would also be reduced.
Tuesday 17 July 2012
The gentle art of extreme air tightness
Now that we have a roof, windows and externally insulated walls, it is time to tackle the air tightness to make sure that this low energy refurb really does end up with low energy bills.
For this refurb, the air tightness layer is on the inside: the plaster on the brick walls, tapes around the windows, and a breather membrane across the rafters in the attic.
Today I was most fortunate to have 2 volunteers to help me with taping up the joins in the Intello. (Thank you Debbie and Elaine!)


The moment of truth will be the air tightness test that will follow in a week or two. The preliminary test (before the plastering and the internal tapes and membranes) was respectable - better than the average new build. But once the internal air tightness barrier is in place, we are aiming for a value below 1 ACH at 50 pascals. Will we manage it? Place your bets now....
For this refurb, the air tightness layer is on the inside: the plaster on the brick walls, tapes around the windows, and a breather membrane across the rafters in the attic.
Today I was most fortunate to have 2 volunteers to help me with taping up the joins in the Intello. (Thank you Debbie and Elaine!)
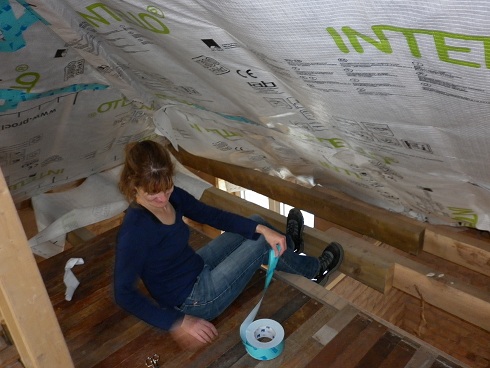
After a little trial and error, I think I have found a way round some of the more complicated details (with the help of the most flexible type of tape in my tool box).

The moment of truth will be the air tightness test that will follow in a week or two. The preliminary test (before the plastering and the internal tapes and membranes) was respectable - better than the average new build. But once the internal air tightness barrier is in place, we are aiming for a value below 1 ACH at 50 pascals. Will we manage it? Place your bets now....
Tuesday 10 July 2012
Cold bridge detailing
Ultra-low energy refurbs should come with a health warning - you need lots of stamina to keep plodding on!

The insulation has taken longer than anticipated. This is largely because of the "complicated bits" which arise when trying to achieve a refurb at the passive house end of the spectrum.

Installing a lesser thickness of insulation would normally be quicker and easier, but putting on 2 layers of boarding in most places and being extremely careful at junctions between wall and roof, window and wall, etc takes more time.
(The greater the insulation thickness, the more any "thin" areas matter - hence places like our eaves junction have taken a lot of effort to achieve what we hope will be a good result).
This week, the boarding is finished and the render coats are well under-way - the end is in sight!
Already, it feels pleasantly warm inside - even with some windows open and no heating system installed. Of course, it should be warm in the house in July - but it has been a rather cold July so far, and it is noticeable that the house is warmer than it was before the insulation went on.

Sunday 8 July 2012
The gas boiler arrives
After the recent post on gas boilers, Alan Clarke gave the following pointers relevant to our ultra low energy refurb...
With a small radiator system it isn't critical to have an ultra small boiler, but roughly speaking the capacity of the radiators ought to match the minimum boiler output - though this will be higher than your heat loss (smallest system boiler is 3kW min I think).
If you'll be having a combi, these have to be reasonably powered to heat water quickly enough for a shower - and hence have a higher minimum output too at 6-7kW - so will need more radiator capacity.
Then I think it is important to have good controls to control the radiator temperature, to derate the output to suit the low heat load of your house.
I like the rehema avanta boilers for dealing with low heating loads this way, these have either a simple room-compensating controller, or a fancy programmable thermostat, which also offers weather compensation. But having used one of these with a local builder in a passivhaus he's asked to use Worcester Bosch for the next job as they are easier to deal with for spares and servicing - and Worcester Bosch now also do boilers with "intelligent controls".
In the event we have gone for an Atag - but it may be some time before know whether this was a good choice or not. Hopefully we'll have moved back in and be using it for hot water in the autumn, and won't need to heat any radiators until November / December....
Sunday 1 July 2012
Air tightness
Just getting to start the external wall insulation took some effort - making sure holes, vents etc in the wall were blocked up (or in some cases filled with foam), and making sure key areas were reasonably air tight with blue felt and blue tape.

The main air tightness barrier will be on the inside - the plaster on the brick walls, and a breathable membrane in the attic room.
However, we want to achieve a pretty good level of air tightness on the outside so that air doesn't get into the insulation layer from the outside and "wick" heat away from the house.
Saturday 23 June 2012
It's all go!
It's been a busy couple of weeks. All of a sudden, there's a lot going on.
First the PV panels appeared (but are not connected up yet). It will be interesting to see how much energy we generate and how much we use during the course of a year. The house will use more energy overall (gas + electric) than the electricity that these PVs can generate, but we are aiming to make that difference as small as possible.

Next came the insulation of the external walls, which is still in progress.

Thursday 7 June 2012
Ground floor to wall junction
We have just spent a very festive Jubilee weekend crawling around on a concrete floor in a quest to achieve air tightness and insulation at the floor-wall junction.
First, our willing helpers did a spot of cleaning (tapes don't stick well to gravel, grit and dust). Rather a lot of cleaning was required.

Then we sealed up as many holes in the brickwork as possible with off-cuts of EPS or a squirt of expanding foam.

The green stuff (Pro Clima DA-S) is supposed to prevent air from finding its way up the walls from below floor level (although it won't be able to do that until the walls are plastered or rendered).

And finally, the insulation up-stands which will reduce heat loss from screed to walls. All we need now is the screed...

Will it work? We should be able to answer that question once the walls are plastered and an air tightness test is carried out.
With hindsight, easier ways to achieve this spring to mind - probably using smaller quantities of materials and saving time and money.
Tuesday 29 May 2012
Door thresholds
In a house that has been well insulated externally, the opportunities for heat loss from the house are greatly reduced. Most of the heat loss that does occur is concentrated around the weakest points, such as those locations where a non-insulating part of the structure passes through the insulation or is poorly insulated.
One tricky area where cold bridging is difficult to minimise is the door threshold. No matter how good the door (these are passive house suitable triple glazed doors called 'EcoPassiv'), the positioning of the door and the cold bridge detailing is still critical.
We have done our best with the back door by placing it in a ply box which protrudes beyond the brickwork and into the insulation. However, it is important that the flow screed does not come into direct contact with the brick walls which are exposed at the door opening.
We have done our best with the back door by placing it in a ply box which protrudes beyond the brickwork and into the insulation. However, it is important that the flow screed does not come into direct contact with the brick walls which are exposed at the door opening.
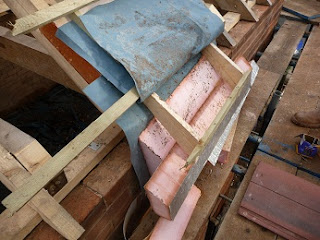
In this case, we removed a course of bricks and placed highly insulating Marmox thermoblocks on top instead. (These will be covered when the flow screed is poured).

The photo shows 4 grey Marmox blocks which sit directly on top of the brickwork. These will reduce heat loss from the screed into the brickwork below. On either side of the Marmox blocks, silver EPS and white external insulation can be seen. Below the slab in the foreground is a 300mm thickness of silver EPS.
Elsewhere, around the edge of every room, up-stands of insulation will form a barrier preventing heat in the screed from transferring horizontally into the brick walls and from there into the ground.
Tuesday 22 May 2012
Which gas boiler?
On the long list of decisions to make is the choice of gas boiler.
Given that hot water use will probably be higher than our heating requirements (and we are low water users to boot), we'll want a boiler that is very, very small. I'm hoping we'll be using less than 5000 kWh per year of gas in total.
A top of the price range, super-efficient boiler won't save us much, given how little gas we will use. A small and basic combi boiler at a correspondingly basic price sounds attractive right now!
Any suggestions?
Air tightness and insulation coming soon
The long gap since the post about insulation below the damp proof course does not indicate a lack of activity - just my lack of interest in groundworks.
Once the groundworks are complete (and essential things like gas, electricity and water which for various reasons are being moved into the garage) we are on to the main external wall insulation and lots of air tightness work - hurray. June will be busy!
One thing to consider if embarking on a refurbishment project is that there are chickens and eggs all over the place, making life complicated and slowing things down.
For example, if the gas meter is on the external wall and you don't want to create a major thermal bridge by only insulating round it, you have to move it. But if you want to put it on the external house wall, that has to be insulated before re-instating the gas meter. So what to do in the meantime? Live without gas? Pay to disconnect and then reinstate, which costs more?
In our case, we decided to move the gas meter to the garage wall. Which would have been very simple if the garage had been in a fit state, but with the whole structure sinking badly, we decided to rebuild. Only now is the new garage wall in place to receive the gas meter. The rest of the garage can't be built until the external wall insulation is complete. So installation of the gas boiler and MVHR unit will have to wait until we have a garage roof. And so it goes on.
Friday 18 May 2012
For more detail about this project...
There is more detail about this project in the 'Homes Behaving Badly' (HOBBS) report - it is the 1950's case study in section 2.3.3.
To view, click here. The report can be downloaded for free as well, and is easier to navigate via the contents page once downloaded.
To view, click here. The report can be downloaded for free as well, and is easier to navigate via the contents page once downloaded.
Tuesday 10 April 2012
Insulation below dpc going on
First boards going on...

Mesh and first 2 coats of render now on, so ready for final coat.

Mesh and first 2 coats of render now on, so ready for final coat.

Preparations for insulation below dpc
Putting external insulation below the damp proof course is rather like giving the house some very warm snow shoes. That and the insulation below the floor slab and against the walls on the inside should keep heat loss down through the walls to a minimum.

But first, preparation - using insulating foam to seal up around any holes or pipes going through the walls.
And secondly, minimising cold bridging below the front and back door by removing some bricks and putting in a layer of super-insulating marmox thermoblocks.

And finally, the sticky stuff that sticks the insulation to the walls....

Friday 6 April 2012
We have a roof!
The house is starting to look more like a house than a ruin now that it has a roof. The benefits of the insulation on the roof and dormer walls won't be fully appreciated until a few more windows have gone in!

Refurbishments based on passive house principles don't usually have roof lights, but we wanted a bit of extra light in the loft room. However, as roof lights go, the quadruple glazed Fakro rooflight with insulated flashing is probably as well insulated as it is possible to get. The challenge will be to make it completely air tight around the opening, and we plan to add extra insulation around the edge on the inside to minimise cold bridging.

The dormer is the first part of the external insulation work to be completed, and it's looking very smart. It took a bit of coordination and thought to get the vertical insulation to meet the roof insulation all round (battens etc. can potentially get in the way), but we think we've got it well and truly covered!

Thursday 15 March 2012
Where would we be without expanding foam?
Now I know why lots of passive houses have nice simple roofs and gable ends - it's so much easier.
Here, we have the insulation above the rafters (hiding beneath the blue felt), meeting up with the first layer of wall insulation, and overlapped by the second layer of wall insulation. And any spare space between there and the last counterbatten is filled with expanding foam.

Helps with air tightness too.

Excess foam is trimmed off and that's it.
Insulating round the windows
To minimise cold bridging, the windows sit forward of the brickwork, in line with the first layer of insulation.
(These are EcoPassiv windows with an insulated wooden frame.)

Then the second layer of insulation overlaps the front of the window frame.

It's easy to do (if the insulation thickness matches the position of the window), effective, and makes a nice size window reveal.

One thing to keep in mind - inward opening windows like these go well with external insulation. The typical UK outward opening window could be restricted by insulation like this in some circumstances.
(These are EcoPassiv windows with an insulated wooden frame.)

Then the second layer of insulation overlaps the front of the window frame.
It's easy to do (if the insulation thickness matches the position of the window), effective, and makes a nice size window reveal.

One thing to keep in mind - inward opening windows like these go well with external insulation. The typical UK outward opening window could be restricted by insulation like this in some circumstances.
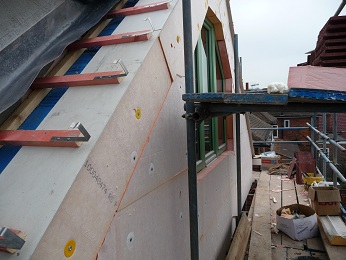
External insulation goes on the dormer
People tell me that energy efficiency and insulation are "un-sexy" and "boring" (while renewable technologies are apparently more exciting).
I beg to differ! It's great watching all this insulation going on (180mm of Phenolic foam boards) - and just thinking how nice and warm it is going to be!

The big thing about insulation is avoiding any gaps. Here, the wall insulation makes a perfect junction with the insulation above the rafters (100mm boards of Celotex directly under the blue felt layer).
At the top of the dormer walls is the junction with the dormer roof above. This is a trickier junction, but we think we've got it covered...
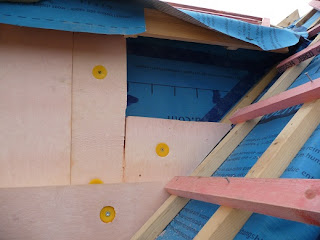
Looking down on the dormer walls from above... The space at the eaves (between the ends of the counterbattens) has been filled with a high grade mineral wool to enhance the junction where roof insulation meets wall insulation beneath.

I beg to differ! It's great watching all this insulation going on (180mm of Phenolic foam boards) - and just thinking how nice and warm it is going to be!

The big thing about insulation is avoiding any gaps. Here, the wall insulation makes a perfect junction with the insulation above the rafters (100mm boards of Celotex directly under the blue felt layer).

At the top of the dormer walls is the junction with the dormer roof above. This is a trickier junction, but we think we've got it covered...

Looking down on the dormer walls from above... The space at the eaves (between the ends of the counterbattens) has been filled with a high grade mineral wool to enhance the junction where roof insulation meets wall insulation beneath.

Sunday 4 March 2012
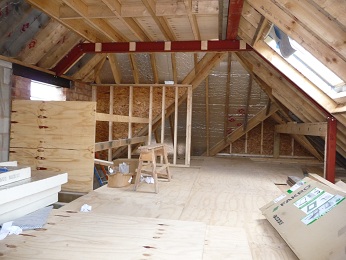
Loft conversion taking shape
The super-insulated loft conversion is starting to look like a super-insulated loft conversion finally.

It will be a while before the insulation between the joists goes in - but with 100mm of Celotex above the rafters, it feels quite sheltered even without all the windows in yet.
The joins between boards of insulation have been taped on the outside, and will now be filled with foam on the inside to make sure that the insulation is continuous and air tight.

Roof progressing rapidly
All of a sudden the roof seems to be coming on in leaps and bounds - so fast we can hardly keep up!
The roof is now almost weather tight, with Fakro quadruple glazed window being fixed into place and taped up.

The front gable is also wrapped and taped. Be sure to employ a builder who can do origami!
Quite how air tight our very traditional but overly complicated roof structure will be when finished, I'm not sure. My best advice would be - buy a house with a simple up and down roof with gable at each end, or put in for planning to make the roof so! Avoid dormers, overhanging gables over bays, and so on!

The back gable is taking shape too - and we're finding that to be a much easier shape to make air tight and without cold bridges. It might not be that long before we have 180mm of insulation all up the back gable wall to join the insulation above the rafters.

It is looking increasingly unlikely that we'll be close enough to EnerPHit to be worth trying for certification. With the benefit of hindsight, there are various things we could have done some time back to make it easier.
Sunday 26 February 2012
Workshops and SuperHomes events
If you live in the Nottingham area and would like the chance to visit this house and find out more about it, March 2012 would be a good time!
On 3rd and 10th March there will be a set of 4 workshops for people looking to make modest or major home improvements of an energy-saving nature. This house is one of the case studies. For all the information, look out for the Homes Behaving Badly workshops on Transition West Bridgford's Eco House Group blog.
Then, on the weekend of 24th March, as part of SuperHomes open homes week, we'll be opening our doors to visitors. To book on a tour, just go to the SuperHomes website and look for Nottingham's Aspiring Superhome, or follow the link to the Homes Behaving Badly workshops and book your place that way instead.
And now the real thing...
Vapour permeable windtight roof tile underlay (Solitex Plus) fixed firmly to the wall, where 180mm of external wall insulation will eventually cover the join. (And yet another air brick to seal up just beneath.)

Once fixed to the insulation board, it just needs the rest of the underlay over the top now. The bottom strip of underlay and the main sheet that goes over the top will be stuck together with a strip of double sided Pro Clima Duplex for air tightness.

All the way round....


Once fixed to the insulation board, it just needs the rest of the underlay over the top now. The bottom strip of underlay and the main sheet that goes over the top will be stuck together with a strip of double sided Pro Clima Duplex for air tightness.

All the way round....

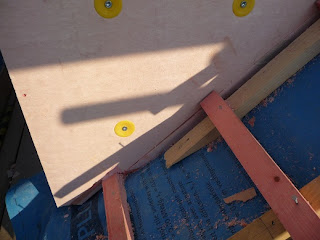
Mocking up the roof insulation at the eaves
With the roof structure up, the builder and the wall insulation team have been working out the eaves detail.
For ultra-low energy buildings, it is extremely important that the roof insulation meets the wall insulation without any gaps. And if you need to achieve air tightness as well, more interesting still.

The best way to figure it out is to mock up the various options. First 100mm of insulation above the rafters, with a pretend bit of weatherproof membrane to fix to the outer face of the brickwork (for air-tightness).
Then wall insulation, and a second layer of weatherproof membrane (stuck firmly to the first where they meet). This second one diverts water into the gutter, so must end up above the counterbattens.

Glad we've got that sorted.
For ultra-low energy buildings, it is extremely important that the roof insulation meets the wall insulation without any gaps. And if you need to achieve air tightness as well, more interesting still.

The best way to figure it out is to mock up the various options. First 100mm of insulation above the rafters, with a pretend bit of weatherproof membrane to fix to the outer face of the brickwork (for air-tightness).

Then wall insulation, and a second layer of weatherproof membrane (stuck firmly to the first where they meet). This second one diverts water into the gutter, so must end up above the counterbattens.

Glad we've got that sorted.
Saturday 25 February 2012
And then it snowed
Climbing the stairs felt a bit like winter mountaineering...

The latest in bedroom decor

Air tightness not quite there yet, but it looks pretty.

The latest in bedroom decor

Air tightness not quite there yet, but it looks pretty.

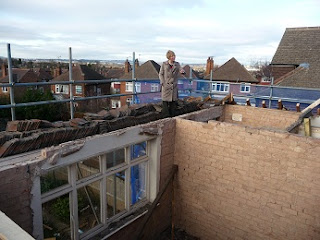
New roof in progress
A lot has happened since the last post. The old roof structure (complete with dubious looking worm-like holes) as completely gone.

As we need insulation above and between the rafters, we have dropped the height of the brick walls to compensate. The top of the new rafters sit below the bottom of the old rafters!

As we need insulation above and between the rafters, we have dropped the height of the brick walls to compensate. The top of the new rafters sit below the bottom of the old rafters!

Sunday 8 January 2012
Floors insulated, roof next
We are following in the footsteps of many other home owners in this street by converting the loft to an attic room. Due to the very poor state of some elements of the roof we will take this opportunity to renew the whole thing - and this means that we can add a lot of insulation and make it as air tight as possible.
Had the tiles and roofing felt been in good condition, we would have done something less drastic, probably placing a high spec insulation between the existing rafters and getting to modern structural standards by adding extra joists and rafters as required.

In our quest to create an ultra-low energy home, we are also blocking up other holes - including the two chimneys and the many air bricks that seem to abound in every room. (There will be ventilation - but it will be controlled using windows and a ventilation system with heat recovery, not through gaps in the building fabric.)
Subscribe to:
Posts (Atom)